Saturday, December 24, 2011

The Best Christmas Gift

This time last year is seared into my brain. My son Connor was 10 days old and still in the NICU (Neonatal Intensive Care Unit). He was born 6 weeks premature and needed to show doctors that he could eat on his own and get rid of his jaundice before he could come home. They couldn't tell us when he would be home, we just had to take it day by day.


Everyday we called at 8 am to talk to the doctors before we headed to the hospital. The days just kept passing and the answer was always the same...

"He's not quite ready to go home yet, maybe tomorrow".

On the 23rd the doctors told us they were 99% sure he would come home Christmas Eve. We were beyond excited. We called the doctors at 8 am that morning and our hearts broke when they told us he had struggled to take one of his feedings that night so they wanted to keep him one more day to make sure it wasn't something more serious. All we could do was cry. They had been so sure the day before, and now he was staying another night. We were devastated. We knew he was in the best place and getting amazing care but it had already been 10 days and we just wanted our sweet boy home. We felt defeated, in that moment it felt like he would never come home.  

After our family Christmas party that Christmas Eve we spent a few hours at the hospital. We couldn't let our little boy be alone Christmas Eve. It was so hard to leave but finally around midnight we went home. We went to bed with heavy hearts that night.

That Christmas morning we got the most amazing surprise! The doctors called us before we could call them and they had great news...

Connor was ready to come home!!

We immediately left for the hospital! (I was even still in PJ'S)

After unhooking all the cords, getting him dressed for the very first time, signing a bunch of paperwork and cutting off the hospital band it was time to go HOME! Nothing can ever top that Christmas present. Now every Christmas we will remember it as the day we brought our miracle boy home.


I can't believe that was all just a year ago. Some days it feels like it was yesterday and other days it feels like it was a lifetime ago.

I can't wait to celebrate Christmas this year with my sweet baby toddler boy.

Merry Christmas!!!!!  

Thursday, December 22, 2011

My First Guest Post

Today I wrote my very first guest post! EEK! Am I a real blogger now?
So please hop on over to 5ohWifey.com and check it out! She's responsible for introducing me to the crazy world that is blogging. She also helps me with my 54389 questions about everything blog related.

But don't stop after my post, keep reading. My friend Ashley aka 5ohWifey is amazing. She is sweet, kind, funny, insightful, witty and best of all...she's honest. Her blog is a must read!


Friday, December 16, 2011

Breastfeeding In Public


I’m sick of having boobs thrown in my face all the time by offensive and indecent breastfeeding mothers like the ones below:


 Wait…Well, this is a bad example. Let’s try again.


Hmm…Just a minute. I’m sure I can find better ones than these…


Eh, still not offensive enough. I’ll check one more time.


That is better. LOOK AT THAT! I see about a half inch of boob. DISGUSTING.


UGH. Look at that indecency! She must be from some third world country to be exposed like that!


Now that’s just…There are no words to describe how inappropriate that is. Something needs to be done!  

But why stop at breastfeeding women? There are boobs everywhere. Beware! If you thought the above photos were offensive, you WILL DEFINITELY be offended by the photos below.


Not this one, though. This one was in plain view on news stands and in mail boxes in 19 countries world wide!


Not this one, either. This one actually won an award!


Oh, and I guess this one is fine too. Everyone knows you can’t sell jeans without someone being topless.


Or beer, for that matter.


Or sunglasses.


Or movie tickets. 


Or CDs… 

You know what? Maybe I’m crazy, but I think that someone mixed up some photos here. The first batch are offensive, but the second batch are just fine and dandy???

People who live in glass bras:


Shouldn’t throw stones.


***I wish I could take credit for this post and say I wrote it but I didn't.***


Wednesday, December 14, 2011

Happy 1st Birthday Sweet Boy

My Sweet Connor,

I cannot believe you are officially 1 year old today! This year has truly been the most amazing year of my life. I had no idea how much I was missing before we had you. I cannot imagine my life without you in it. You truly are the center of our universe. 

You have changed so much in a year. 


You are so smart; learning new things everyday! Your favorite words are doggy, Bah-Bah, Dada, Daddy, and Momma (only when you're upset). You also love to growl, it's hysterical! 

You are slowly but surely gaining confidence with walking. You've been cruising the furniture for awhile now but in the past 2 weeks you will actually let go and walk 3-6 steps towards wherever you're going before you drop down and crawl. It's amazing to see. Every night your Daddy and I sit on the floor and have you walk back and forth to us. You love it, you think it's the funnest game and we love to see you becoming a big boy right before our eyes.

You also love to eat, definitely our kid. You love to eat whatever we're eating and there's not much you don't like. Really I can only think of one thing...peaches. Doesn't matter if it's in baby food form or sliced fresh peaches. You hate them, no doubt about it, the gagging makes it very clear. Daddy is disappointed, peaches are his favorite. 

You love to run errands with me. We are constantly on the go; play dates, the park, grocery shopping, the bank, anything. And you love to interact with everyone we encounter, and they of course tell me you are the cutest thing! Which I already know. 

It's scary to think how fast this year has gone by. Is every year going to go by as fast? If so then you'll be in high school in what seems like 5 minutes. 

I know you have no idea that today is your birthday but in a couple years you will cherish this day. The day we celebrate YOU and only you. I will try to not cry each year when you blow out your candles but I can't make any promises. 

Everyday I love you more. I cherish our close bond. You are my son, my best friend, my reason for breathing.

I love you so much my sweet boy. Happy 1st Birthday! 

Love Forever,
Momma
xoxo

Tuesday, December 13, 2011

DIY Monster Birthday Party Decorations

I already showed you how I made monster cake pops for Connor's 1st Birthday party which after months of planning, was a HUGE success

Since I wanted to do a "Monster" theme I had to make all of the decorations myself. I wanted cute monsters, not scary ones. I couldn't wait to make the things I found on Pinterest, with my own twist of course!

First I made Monsters out of tissue boxes and filled them with Hershey Kisses. It was super easy and really fun! 


What You Need:

Tissue Box (buy the lightest color one you can with the least amount of designs)
Paint & Paint Brushes
Paper Plate
Pipe Cleaners
White Paper
Hershey Kisses
Craft Glue
Scissors

First paint the inside and outside of your tissue box. Then paint dots or any other design you like. 

To make the eyes; cut 2 circles per eye out of a paper plate. Paint one of the circles the color of your monster. On the other circle paint and eyelid and pupil. Once dry, glue a pipe cleaner in between both circles. Once completely dry, bend the pip cleaner and stick it in the cardboard crease in the back of your tissue box. (I tried sticking it in a small hole in the top of the box but the pipe cleaner would not stand up. It works best to wedge it in the crease)

Fill with candy! We did Hershey Kisses so that it would be Monster Kisses! :) 


The next thing I made were little crocheted Monsters! They are so cute! 


I found them on Pinterest which linked back to this blog, which explains exactly how to make them. I have to say though, unless you already know how to crochet, these will probably be too hard to make. I LOVE how they turned out! I just put them around the party as decoration. The kids loved playing with them!

What You Need:  

Yarn 
Crochet hook (your favorite size)
Stuffing
Embroidery Floss
White Felt
Googly Eyes
Craft Glue
Scissors
Yarn Needle
Embroidery Needle 

Steps/Pattern:

1. Make a magic circle

2. Single crochet 6 into your magic circle.Then close the magic circle. 

3. Single crochet twice into each stitch. (12 stitches) Place stitch marker. (I just use a small piece of yarn in another color.)

4. Now single crochet in the first stitch and single crochet twice in the 2nd stitch. (this is how you will increase the size of the circle...1,2,1,2 etc.) Continue doing so until you reach the stitch marker. (18 stitches)

5. Move stitch marker to this row. Single crochet once into the first two stitches. Then single crochet twice into the third stitch. Continue this pattern (1,1,2,1,1,2, etc) until you reach the stitch marker. (24 stitches) 

You can make your monsters as big as you want my continuing to increase your circle. Each row increases by 6 stitches. So if you wanted to increase the next row to 30 the pattern would be 1,1,1,2,1,1,1,2, etc. My larger monsters are 24 and my smaller ones are 18. Once you decide how big you want the monster, you stop increasing. 

6. Then single crochet into each stitch. So if your circle is 24 stitches, you will single crochet into each stitch only once. Never increasing.

7. Keep creating rows by single crocheting into each stitch until your monster is the height you want it. Some of mine I did 12 rows and the smaller only have 9. Make sure to use your stitch marker at the end of each row so you know when one row ends and another begins. 

8. Finish with a slip knot. Make sure when you cut your yarn you leave a long piece, you will use this to sew the monster to it's bottom piece.

9. Create the bottom of your monster by creating another circle with steps 1-6. 

10. Cut circle or whatever shape you prefer out of white felt for the eyes. Using your embroidery floss and embroidery needle sew the felt onto your monster where you want the eyes to be. Imagine how you would sew on a button, this is how you would sew on the felt, in a X shape. 

11. Glue the googly eyes onto the felt, covering the embroidery floss. 

12. Using either embroidery floss or yarn of another color, sew on a mouth. 

13. Using the long piece of yarn you left at the bottom of your monster, sew the two pieces together with your yarn needles. Make sure to leave a hole big enough to stuff your monster with stuffing before you close it!


As I mentioned, I'm not sure I would attempt these unless you have a little crochet experience. I am not an expert at crochet but I have been making blankets and scarves since I was 12, so I'm very comfortable with your basic single crochet but had never done anything like this. My first attempt was HORRIBLE and I threw it away. But when I was confused I turned to YouTube. You can look up anything! There are a bunch of crochet tutorials. So if you are confused about anything I mentioned in the patten, YouTube it. That's what I did. :)

Good luck! 

Thursday, December 8, 2011

DIY Monster Cake Pops

I promised I would write about the DIY projects I did for Connor's 1st Birthday Party. After months of planning and many hours on Pinterest I had my ideas and last week I got to finally make them! 

I always knew I would make Connor his own smash cake but went back and forth with what I was going to make for everyone else at the party. First I was going to make monster cupcakes, but after I did a trial-run for my book club and they turned out horrible, I scratched that idea. After a lot of brainstorming and changing my mind 50 a bunch of times I finally decided to make Cake Pops! I was a little nervous because I had never made them and I'm a perfectionist, oh and because other than seeing pictures of Cake Pops, I've never actually had one. 

Cake Pops are REALLY easy to make and delicious! Thanks to Bakerella and YouTube for showing me exactly what to do and how to do it!


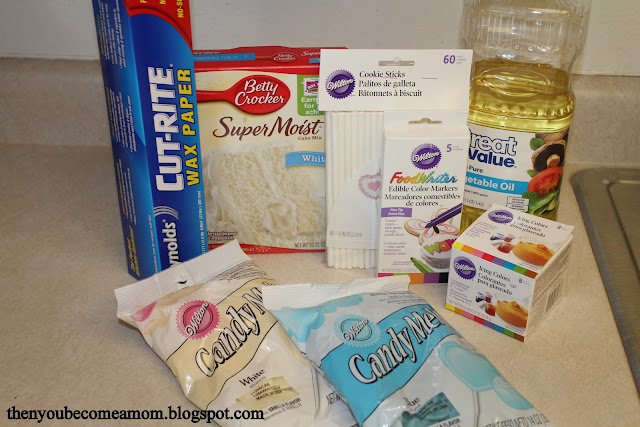
Here's what you'll need to make Monster Cake Pops:

Cake Mix - And all the ingredients it calls for. I made around 45, so I used 2 boxes of cake. Chocolate Fudge & White
Frosting - I used Chocolate and Cream Cheese frosting (not pictured)
Vegetable Oil 
Cookie Sticks - I found a package of 60 for $3.99 at Michael's Craft Store 
Icing Coloring - Do NOT use regular food coloring. It will mess up the consistency of your melted chocolate. Make sure to get the gel coloring. I found Wilton's Icing Coloring at Michael's.
Edible Color Markers - Also from Michael's.
Candy Melts - I wanted blue and green monsters. They actually had blue candy melts but I bought white and added coloring to get green.
Wax Paper
White M&M's - I found these at Party City. (not pictured)


Bake the cake per the instructions. Once it's cooled, cut it into 4 sections and put into a large mixing bowl. Then using your hands crush the cake into crumbs. Then add half the can of frosting and mix well. (Again using your hands is the easiest, messiest but easiest.) 

Once it's thoroughly mixed it will be a cookie dough consistency. Roll into approx. 1 inch balls. Place on a wax paper lined cookie sheet. Put them in the freezer for 15 minutes, you do not want them to freeze so after after 15 minutes put them in the refrigerator until you are ready to dip them. 


Melt your chocolate according to the package instructions. I don't have a double boiler so I did mine in the microwave and it turned out fine. You want the consistency to be pretty runny so that it coats the Cake Pop smoothly without lumps. You may not need to, but I added some vegetable oil to help get the desired consistency. Add food coloring until you reach the desired color.

Then dip the tip of the stick into the melted chocolate and then push into the cake ball, approximately half way through. Then submerge the entire cake ball into the chocolate. (Note: Since writing this I have found that first inserting all the sticks into the cake pops before dipping them in the chocolate is better because it gives the sticks time to set up in the cake pop.)

Do not stir, it will cause the cake to fall off the stick. Instead, rock the cake back and forth until fully covered. Then tap the stick on the edge of the bowl while slowly turning the cake pop to get any extra chocolate off. Don't tap too hard or your cake pop will fall off the stick! (This happened a few times but luckily my husband was there to eat all the oops!

Once you have the excess chocolate off, immediately stick the eyeballs on. Make sure to put the M&M logo side down. I made some with 1, 2 and 3 eyes. Tip: Do not draw on the pupils until after. The pen never really dries so when you put the M&M on, the dot smears.

Stick the Cake Pops into styrofoam to dry. Once dry, draw on the pupils. I stored my Cake Pops in the refrigerator over night. 

Note: I've also learned that you are NOT supposed to store them in the fridge, they tend to sweat and the chocolate can crack, although this did not happen to me. I now know the best way to store them is in an air tight container once they have fully hardened. :)


If you need further instructions on how to dip your Cake Pops, check out this video that I found, she explains it SO well.

The hardest part of making Cake Pops is finding a cute way to display them. I ended up using a cardboard box top from a case of copy paper. I wrapped the lid with silver wrapping paper, hot glued a green ribbon around it and lined the inside with a piece of styrofoam. Once the Cake Pops were all in, I poured 3 large bags of Skittles in the bottom to hide the stryofoam. :)


I also made cake labels so guests could choose which kind of cake they wanted. I found a really fun font in Microsoft Word and printed it on regular paper and then glued it onto extra scrap booking paper from another DIY project I will be writing about soon. Then I taped a Cake Pop stick to the back and tied a bow with left over ribbon. Voila!


These Cake Pops were so much fun to make. I made approx. 45 of them for a party of about 27 people and there weren't any left over! Everyone loved them! And I have to admit...I was pretty impressed with how they turned out! I can't wait to make them again and experiment with different designs. 

Do NOT hesitate to make these for your next party, or just for fun for your kids!  

Wednesday, December 7, 2011

Wordless Wednesday #6


I WILL do this when I own a house. Hopefully my future neighbor has a sense of humor. :)

Tuesday, December 6, 2011

Connor's 1st Birthday Party!

Connor's party was perfect! Everything turned out wonderful and we were surrounded by people we love! We missed a few of you who were unable to make it but felt your love regardless. I can't believe it but I didn't shed any tears! Maybe that's because he isn't really turning 1 until the 14th. So for now, he's still my baby...no toddler in this house!


Connor, 

I know you're too young and won't remember your 1st birthday party, but I'll make sure to show you the 534 pictures we took when you're older. But I just wanted to tell you that you loved it. You even unwrapped your own gifts, with a tiny help from Momma you are the smartest 1 year old I know! There were no melt-downs, not 1 tear (from you or me), you weren't shy, in fact I think you played with everyone at some point. You loved all the attention!

We may have had 1 hiccup at the party when Grammie came to me worried, saying you were missing. Um WHAT!? Well we found you.... in the bathroom ....door closed....playing in the toilet. You're a sneaky one that's for sure, and FAST! We have no idea how you snuck away and no one noticed. It wasn't a proud moment and I had to take deep breaths and try not to panic, because after all, you were OK. Every kid needs a story of their parents "losing" them, right? I think mine was at a party on a big yacht, right Mom? Just another life lesson my sweet boy.

We all love you so much baby, but I must say...Momma loves you the MOST. I waited my whole life for you. I knew I would have a little boy, I had dreams about it for years and years. But my dreams were wrong, the little boy in my dreams was nothing compared to you. You are amazing. You are sweet. You are very funny. You are loving. You are so smart. You are handsome. You are my sweet sweet baby boy and that my son, you will always be. No matter what age we celebrate at your birthday party. I love you as much as the dirt and leaves. 

Love, Momma xoxo

Monday, December 5, 2011

Why I've Been MIA

It has been a crazy week and a half! 

First there was Thanksgiving; my poor Mom's oven broke a few days before so our traditional Thanksgiving dinner at my parents was moved to my house. Which I must say...I loved. I love having people over and it forced me to do some deep cleaning that I had been avoiding. 

It was an extra special day because it was Connor's 1st Thanksgiving! He loved the garlic mashed potatoes and turkey, he ate more than I thought would fit in his tummy. It was straight to the bath after dinner for him, what a mess! 

Tip of the day: Do NOT wash the mountain of dishes in hot hot water while baby is still finishing dinner. Why? Because when Grammie goes to give him a bath and wash all the mashed potatoes out of his ears and hair, she will have to do it in cold water. Poor baby! SORRY! 

Thanksgiving in pictures....


Then of course there was Black Friday. I am not one of those crazies dedicated people who are willing to stand in line for hours in the cold to save a couple bucks. Plus when you have an almost-one-year-old he is not going to care that you were out shopping all night, he is still going to want to get up and play at 7:30 am. Ouch. Connor, what happened to sleeping in until 9? Momma is missing it. 

I did however battle some crowds the next morning. My best friend Danielle and I went to Kohl's to check out the toys. SO WORTH IT. The learning toys were 50-65% off AND I had a coupon for 15% off your entire order. Can you say score!? I Santa found everything I had been planning on getting for Connor and I only spent $50! Which earned me $15 free Kohl's cash! YES! I got Connor a baby laptop that teaches numbers, letters, and shapes. Maybe now he'll leave my laptop alone so I can write this blog If only it were that easy. I also got him a baby cell phone, in the hopes it will keep him away from my IPhone, which he is obsessed with even though I have never let him play with it. I got him a couple other toys and a bunch of long sleeve t-shirts in 18 months because my big boy is outgrowing all his 12 month clothes. But the best thing I found? An inflatable ball pit for $20!! I am so excited! He is going to love love love it! And no, I won't mind picking up all the balls, he has other toys that are just as messy, and the few minutes it takes me every night to clean up the toys are worth every quiet moment I get during the day when Connor is playing by himself like a big boy.


That Sunday was also my husband's 29th birthday!!! Yikes, last year of his twenties. I told him next year I'm trading him in for a newer model! HAHA! It was his 1st birthday as a Daddy, so it was extra special. We have a tradition that we go over to my parents house on our birthdays (not to be confused with Sunday Dinners) and my Mom makes us our favorite dinner and we get a mint chocolate chip ice cream cake from Baskin Robbins. YUM. (I'm a horrible wife, I forgot to bring the camera.)

Monday morning I hit the ground running, literally. I had SO much to do before Connor's 1st Birthday Party, which was yesterday. Which I will tell you all about tomorrow. :) I also did a bunch of DIY projects that I will be writing about later, stay tuned! They are pretty awesome.