Showing posts with label DIY. Show all posts

Thursday, February 9, 2012

DIY Motivational Weightloss Jars

Since I'm on this journey of losing weight I decided I need to have something that I see everyday to help me stay motivated.

A lot of people hang up a picture or a bikini as motivation but I needed something more, something that not only helps keep me motivated but lets me see my progress. Thanks to Pinterest I found the perfect thing!

I'm not sure what they're called but I'm calling them "Weightloss Jars"

Here's what you'll need:
  • Marbles or glass rocks. 1 for each pound you're trying to lose. 
  • 2  jars or vases. Make sure they are big enough to hold all the marbles/rocks.
  • Something to write on the jars/vases. I used Glitter Glue but you could use stickers, paint, or anything else that will write on glass.
That's it! I purchased all of these things at my local craft store for around $25. I'm sure I could have shopped around for vases that were better priced but with a 1 year old  sometimes it's easier to just pay the extra so you can just go to 1 store. ;)
My friend Danielle is making these too so in this picture there are enough for 2 sets. 

1. Decide what you want written on your vase. For Example: Pounds to Lose vs Pounds 2 Go. Then practice writing it.
 Danielle practicing on a paper plate.

2. Verrry carefully write this on your vase, or paint it on, stick the stickers on or however you decided to do it.
Note: If you went with Glitter Glue and you mess up, use Windex and a paper towel and it wipes right off. :)
You can't see it in this picture but my hand was shaking so bad! 
 
3. Determine how many pounds you must lose in order to achieve your goal weight. Count out that many marbles/glass rocks.
43 rocks = 43 pounds to go. 8 pounds of which are already gone!

4. Put your rocks in the "Pounds To Lose" vase. If you're like us and have already lost some of the weight, move 1 rock per pound to the "Pounds Lost" vase. Ahh doesn't that feel nice!? 

  Now as you lose weight you will see the first vase slowly empty and the second vase fill up! And imagine how good it will feel to move those rocks over to the "Pounds Lost" vase!? I can tell you, it feels awesome! It's also a great motivator because the last thing you want is to gain and have to move a rock back to the first vase! AH scary thought!

For me, this is much more motivating then hanging a silly bathing suit on the wall. You can actually see your progress which is so inspiring. Not to mention they are cute and look great on a bathroom sink. :)

Tuesday, December 13, 2011

DIY Monster Birthday Party Decorations

I already showed you how I made monster cake pops for Connor's 1st Birthday party which after months of planning, was a HUGE success

Since I wanted to do a "Monster" theme I had to make all of the decorations myself. I wanted cute monsters, not scary ones. I couldn't wait to make the things I found on Pinterest, with my own twist of course!

First I made Monsters out of tissue boxes and filled them with Hershey Kisses. It was super easy and really fun! 


What You Need:

Tissue Box (buy the lightest color one you can with the least amount of designs)
Paint & Paint Brushes
Paper Plate
Pipe Cleaners
White Paper
Hershey Kisses
Craft Glue
Scissors

First paint the inside and outside of your tissue box. Then paint dots or any other design you like. 

To make the eyes; cut 2 circles per eye out of a paper plate. Paint one of the circles the color of your monster. On the other circle paint and eyelid and pupil. Once dry, glue a pipe cleaner in between both circles. Once completely dry, bend the pip cleaner and stick it in the cardboard crease in the back of your tissue box. (I tried sticking it in a small hole in the top of the box but the pipe cleaner would not stand up. It works best to wedge it in the crease)

Fill with candy! We did Hershey Kisses so that it would be Monster Kisses! :) 


The next thing I made were little crocheted Monsters! They are so cute! 


I found them on Pinterest which linked back to this blog, which explains exactly how to make them. I have to say though, unless you already know how to crochet, these will probably be too hard to make. I LOVE how they turned out! I just put them around the party as decoration. The kids loved playing with them!

What You Need:  

Yarn 
Crochet hook (your favorite size)
Stuffing
Embroidery Floss
White Felt
Googly Eyes
Craft Glue
Scissors
Yarn Needle
Embroidery Needle 

Steps/Pattern:

1. Make a magic circle

2. Single crochet 6 into your magic circle.Then close the magic circle. 

3. Single crochet twice into each stitch. (12 stitches) Place stitch marker. (I just use a small piece of yarn in another color.)

4. Now single crochet in the first stitch and single crochet twice in the 2nd stitch. (this is how you will increase the size of the circle...1,2,1,2 etc.) Continue doing so until you reach the stitch marker. (18 stitches)

5. Move stitch marker to this row. Single crochet once into the first two stitches. Then single crochet twice into the third stitch. Continue this pattern (1,1,2,1,1,2, etc) until you reach the stitch marker. (24 stitches) 

You can make your monsters as big as you want my continuing to increase your circle. Each row increases by 6 stitches. So if you wanted to increase the next row to 30 the pattern would be 1,1,1,2,1,1,1,2, etc. My larger monsters are 24 and my smaller ones are 18. Once you decide how big you want the monster, you stop increasing. 

6. Then single crochet into each stitch. So if your circle is 24 stitches, you will single crochet into each stitch only once. Never increasing.

7. Keep creating rows by single crocheting into each stitch until your monster is the height you want it. Some of mine I did 12 rows and the smaller only have 9. Make sure to use your stitch marker at the end of each row so you know when one row ends and another begins. 

8. Finish with a slip knot. Make sure when you cut your yarn you leave a long piece, you will use this to sew the monster to it's bottom piece.

9. Create the bottom of your monster by creating another circle with steps 1-6. 

10. Cut circle or whatever shape you prefer out of white felt for the eyes. Using your embroidery floss and embroidery needle sew the felt onto your monster where you want the eyes to be. Imagine how you would sew on a button, this is how you would sew on the felt, in a X shape. 

11. Glue the googly eyes onto the felt, covering the embroidery floss. 

12. Using either embroidery floss or yarn of another color, sew on a mouth. 

13. Using the long piece of yarn you left at the bottom of your monster, sew the two pieces together with your yarn needles. Make sure to leave a hole big enough to stuff your monster with stuffing before you close it!


As I mentioned, I'm not sure I would attempt these unless you have a little crochet experience. I am not an expert at crochet but I have been making blankets and scarves since I was 12, so I'm very comfortable with your basic single crochet but had never done anything like this. My first attempt was HORRIBLE and I threw it away. But when I was confused I turned to YouTube. You can look up anything! There are a bunch of crochet tutorials. So if you are confused about anything I mentioned in the patten, YouTube it. That's what I did. :)

Good luck! 

Thursday, December 8, 2011

DIY Monster Cake Pops

I promised I would write about the DIY projects I did for Connor's 1st Birthday Party. After months of planning and many hours on Pinterest I had my ideas and last week I got to finally make them! 

I always knew I would make Connor his own smash cake but went back and forth with what I was going to make for everyone else at the party. First I was going to make monster cupcakes, but after I did a trial-run for my book club and they turned out horrible, I scratched that idea. After a lot of brainstorming and changing my mind 50 a bunch of times I finally decided to make Cake Pops! I was a little nervous because I had never made them and I'm a perfectionist, oh and because other than seeing pictures of Cake Pops, I've never actually had one. 

Cake Pops are REALLY easy to make and delicious! Thanks to Bakerella and YouTube for showing me exactly what to do and how to do it!


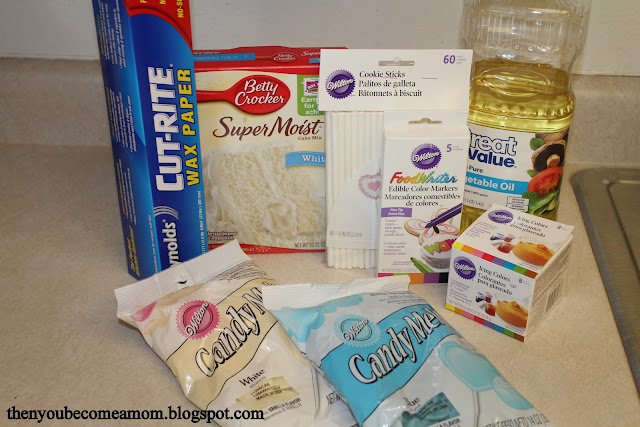
Here's what you'll need to make Monster Cake Pops:

Cake Mix - And all the ingredients it calls for. I made around 45, so I used 2 boxes of cake. Chocolate Fudge & White
Frosting - I used Chocolate and Cream Cheese frosting (not pictured)
Vegetable Oil 
Cookie Sticks - I found a package of 60 for $3.99 at Michael's Craft Store 
Icing Coloring - Do NOT use regular food coloring. It will mess up the consistency of your melted chocolate. Make sure to get the gel coloring. I found Wilton's Icing Coloring at Michael's.
Edible Color Markers - Also from Michael's.
Candy Melts - I wanted blue and green monsters. They actually had blue candy melts but I bought white and added coloring to get green.
Wax Paper
White M&M's - I found these at Party City. (not pictured)


Bake the cake per the instructions. Once it's cooled, cut it into 4 sections and put into a large mixing bowl. Then using your hands crush the cake into crumbs. Then add half the can of frosting and mix well. (Again using your hands is the easiest, messiest but easiest.) 

Once it's thoroughly mixed it will be a cookie dough consistency. Roll into approx. 1 inch balls. Place on a wax paper lined cookie sheet. Put them in the freezer for 15 minutes, you do not want them to freeze so after after 15 minutes put them in the refrigerator until you are ready to dip them. 


Melt your chocolate according to the package instructions. I don't have a double boiler so I did mine in the microwave and it turned out fine. You want the consistency to be pretty runny so that it coats the Cake Pop smoothly without lumps. You may not need to, but I added some vegetable oil to help get the desired consistency. Add food coloring until you reach the desired color.

Then dip the tip of the stick into the melted chocolate and then push into the cake ball, approximately half way through. Then submerge the entire cake ball into the chocolate. (Note: Since writing this I have found that first inserting all the sticks into the cake pops before dipping them in the chocolate is better because it gives the sticks time to set up in the cake pop.)

Do not stir, it will cause the cake to fall off the stick. Instead, rock the cake back and forth until fully covered. Then tap the stick on the edge of the bowl while slowly turning the cake pop to get any extra chocolate off. Don't tap too hard or your cake pop will fall off the stick! (This happened a few times but luckily my husband was there to eat all the oops!

Once you have the excess chocolate off, immediately stick the eyeballs on. Make sure to put the M&M logo side down. I made some with 1, 2 and 3 eyes. Tip: Do not draw on the pupils until after. The pen never really dries so when you put the M&M on, the dot smears.

Stick the Cake Pops into styrofoam to dry. Once dry, draw on the pupils. I stored my Cake Pops in the refrigerator over night. 

Note: I've also learned that you are NOT supposed to store them in the fridge, they tend to sweat and the chocolate can crack, although this did not happen to me. I now know the best way to store them is in an air tight container once they have fully hardened. :)


If you need further instructions on how to dip your Cake Pops, check out this video that I found, she explains it SO well.

The hardest part of making Cake Pops is finding a cute way to display them. I ended up using a cardboard box top from a case of copy paper. I wrapped the lid with silver wrapping paper, hot glued a green ribbon around it and lined the inside with a piece of styrofoam. Once the Cake Pops were all in, I poured 3 large bags of Skittles in the bottom to hide the stryofoam. :)


I also made cake labels so guests could choose which kind of cake they wanted. I found a really fun font in Microsoft Word and printed it on regular paper and then glued it onto extra scrap booking paper from another DIY project I will be writing about soon. Then I taped a Cake Pop stick to the back and tied a bow with left over ribbon. Voila!


These Cake Pops were so much fun to make. I made approx. 45 of them for a party of about 27 people and there weren't any left over! Everyone loved them! And I have to admit...I was pretty impressed with how they turned out! I can't wait to make them again and experiment with different designs. 

Do NOT hesitate to make these for your next party, or just for fun for your kids!  

Friday, November 25, 2011

DIY TV Cord Cover

We got our 50" Plasma hubby had to have a 50" on Black Friday 2008. Instead of buying an entertainment center, we hung our TV on the wall above the TV stand and put matching bookcases on either side, MUCH cheaper. Great idea except for one small problem, you see all the TV cords, which drives me crazy! 

Well it only took me 3 years but I finally took care of it. I'm hosting Thanksgiving at my house this year because my Mom's oven broke a week before Thanksgiving and I'm trying to make my house presentable. Since there is nothing I can do about the endless baby gear/toys in my house, I thought I would hide these dang cords once and for all. 

It took some serious brainstorming but I decided the best way to hide the cords was to cover a piece of cardboard with fabric and then attach it to the wall. It was super easy and only took about 30 minutes. The best part? It only cost $13.88!!

What you'll need: 
  • Large piece of cardboard (I used a Tri-Fold Presentation Board)
  • Appropriate size of fabric (I chose black with a small ribbed texture)
  • Duct tape
  • Tape measure
  • Scissors
  • 4-5 picture hanging nails
First I had to cut a little off the top of the cardboard and add it to the side in order to make it longer. (They didn't have a piece of cardboard long enough)

Then I laid the cardboard on top of the fabric and trimmed the fabric so only about an inch was left on either side.


Then I wrapped the fabric around and taped it to the back of the cardboard. Make sure to stretch the fabric tight but not too tight, you don't want ripples. 


Then just tape, tape, tape. I had a little rippling around the corners but once hung on the wall it didn't show because it was behind the bookcase.


Then I had my husband nail it to the wall. We nailed it in all four corners and once in the middle at the bottom. You can't see the nails because I made sure to make the cardboard slightly bigger than needed, so the nails are behind the bookcases. 
I am SO happy with how it turned out! It really gives the illusion of an entertainment center, instead of 3 seperate pieces of furniture. 


As you can see, we keep Connor's toys on the bottom two shelves. We have no choice now that he's mobile, he gets into everything. We can't have our DVD player or cable box in the designated spots in the TV stand anymore because Connor constantly changes the channel, so they too were moved up high on the bookcase. My whole house is slowly but surely being taken over by Connors baby crap stuff.

I haven't even thought about how the heck I'm going to have a Christmas tree this year. Yikes.
 

Tuesday, November 22, 2011

Mom Brain

Pregnancy is harmful to your health, really it is. Say goodbye to your perfect memory and hello to forgetfulness. 

We've all heard of Pregnancy Brain. That horrible forgetfulness that you develop while pregnant. The doctors promise that it's temporary and it will go away after they baby is born. They lied. 

It doesn't go away, they just call it something different. Mom Brain. 

You suffer from Mom Brain if you've ever:

  • Lost your car keys and found them in the refrigerator, the front door, etc.
  • Put on a shirt inside out and wore it the entire day that way
  • Went to the store to pick up milk, bought a bunch of other things but forgot the milk
  • Put the ice cream in the cupboard
  • Got out of the shower and realized you forgot to rinse out the conditioner
  • Pack yourself something to eat and when you go to eat it realize you packed Puffs, goldfish and cheerios
  • Shaved only 1 leg in the shower

Well Mom Brain won this week. I totally forgot to get Connor something to wear on Thanksgiving. It is his first Thanksgiving after all. Yesterday I went to a bunch of stores looking for a onesie, a bib, a shirt, anything that said My First Thanksgiving, or something like it. There was NOTHING. Everything was already gone and replaced by Christmas outfits, which I already have.

So last minute, thanks to my Mom Brain, I bought some fabric paint from the craft store and made a Thanksgiving onesie. If you know me, than you know I DO NOT have a steady hand. So needless to say, it's a very lame onesie. But hey, I just need to get a couple pictures of him in it for his baby book and then I can put him in one of his gazillion cute outfits I already have. 


Last year at Thanksgiving dinner all we could talk about was how this time next year we would have an almost 1 year old eating turkey and mashed potato's at the table with us; and here we are a year later. I know I keep saying it, but this year really has gone by way too fast. My sweet baby boy is going to be a toddler in 22 days! EEK!


I love you my sweet boy! You'll always be my baby no matter how old you are.