I always knew I would make Connor his own smash cake but went back and forth with what I was going to make for everyone else at the party. First I was going to make monster cupcakes, but after I did a trial-run for my book club and they turned out horrible, I scratched that idea. After a lot of brainstorming and changing my mind
Cake Pops are REALLY easy to make and delicious! Thanks to Bakerella and YouTube for showing me exactly what to do and how to do it!
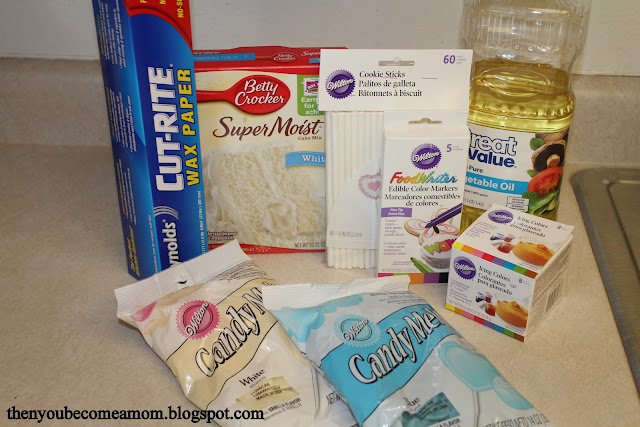
Here's what you'll need to make Monster Cake Pops:
Cake Mix - And all the ingredients it calls for. I made around 45, so I used 2 boxes of cake. Chocolate Fudge & White
Frosting - I used Chocolate and Cream Cheese frosting (not pictured)
Vegetable Oil
Cookie Sticks - I found a package of 60 for $3.99 at Michael's Craft Store
Icing Coloring - Do NOT use regular food coloring. It will mess up the consistency of your melted chocolate. Make sure to get the gel coloring. I found Wilton's Icing Coloring at Michael's.
Edible Color Markers - Also from Michael's.
Candy Melts - I wanted blue and green monsters. They actually had blue candy melts but I bought white and added coloring to get green.
Wax Paper
White M&M's - I found these at Party City. (not pictured)
Bake the cake per the instructions. Once it's cooled, cut it into 4 sections and put into a large mixing bowl. Then using your hands crush the cake into crumbs. Then add half the can of frosting and mix well. (Again using your hands is the easiest, messiest but easiest.)
Once it's thoroughly mixed it will be a cookie dough consistency. Roll into approx. 1 inch balls. Place on a wax paper lined cookie sheet. Put them in the freezer for 15 minutes, you do not want them to freeze so after after 15 minutes put them in the refrigerator until you are ready to dip them.
Melt your chocolate according to the package instructions. I don't have a double boiler so I did mine in the microwave and it turned out fine. You want the consistency to be pretty runny so that it coats the Cake Pop smoothly without lumps. You may not need to, but I added some vegetable oil to help get the desired consistency. Add food coloring until you reach the desired color.
Then dip the tip of the stick into the melted chocolate and then push into the cake ball, approximately half way through. Then submerge the entire cake ball into the chocolate. (Note: Since writing this I have found that first inserting all the sticks into the cake pops before dipping them in the chocolate is better because it gives the sticks time to set up in the cake pop.)
Do not stir, it will cause the cake to fall off the stick. Instead, rock the cake back and forth until fully covered. Then tap the stick on the edge of the bowl while slowly turning the cake pop to get any extra chocolate off. Don't tap too hard or your cake pop will fall off the stick! (This happened a few times but luckily my husband was there to eat all the oops!)
Once you have the excess chocolate off, immediately stick the eyeballs on. Make sure to put the M&M logo side down. I made some with 1, 2 and 3 eyes. Tip: Do not draw on the pupils until after. The pen never really dries so when you put the M&M on, the dot smears.
Stick the Cake Pops into styrofoam to dry. Once dry, draw on the pupils. I stored my Cake Pops in the refrigerator over night.
Note: I've also learned that you are NOT supposed to store them in the fridge, they tend to sweat and the chocolate can crack, although this did not happen to me. I now know the best way to store them is in an air tight container once they have fully hardened. :)
If you need further instructions on how to dip your Cake Pops, check out this video that I found, she explains it SO well.
The hardest part of making Cake Pops is finding a cute way to display them. I ended up using a cardboard box top from a case of copy paper. I wrapped the lid with silver wrapping paper, hot glued a green ribbon around it and lined the inside with a piece of styrofoam. Once the Cake Pops were all in, I poured 3 large bags of Skittles in the bottom to hide the stryofoam. :)
I also made cake labels so guests could choose which kind of cake they wanted. I found a really fun font in Microsoft Word and printed it on regular paper and then glued it onto extra scrap booking paper from another DIY project I will be writing about soon. Then I taped a Cake Pop stick to the back and tied a bow with left over ribbon. Voila!
These Cake Pops were so much fun to make. I made approx. 45 of them for a party of about 27 people and there weren't any left over! Everyone loved them! And I have to admit...I was pretty impressed with how they turned out! I can't wait to make them again and experiment with different designs.
Do NOT hesitate to make these for your next party, or just for fun for your kids!


3 comments:
i cant get over how stinking cute you are steph ! keep up the good work.
The were such a great idea. Everyone (grownup's included) thought they were great. You never cease to amaze me. Love you!
Cake balls are always so much fun to make! You had a wonderful idea to use them as monsters for his party!! Love it!
Post a Comment